Introduction
Victims
Suspects
Witnesses
Ripper Letters
Police Officials
Official Documents
Press Reports
Victorian London
Message Boards
Ripper Media
Authors
Dissertations
Timelines
Games & Diversions
Photo Archive
Ripper Wiki
Casebook Examiner
Ripper Podcast
About the Casebook


Most Recent Posts:
Macnaghten, Sir Melville: Macnaughten Memorandum - by Lewis C 6 minutes ago.
Abberline, Inspector Frederick: The Investigator's Suspects - by Lewis C 21 minutes ago.
Elizabeth Stride: The Schwartz/BS Man situation - My opinion only - by NotBlamedForNothing 1 hour ago.
Macnaghten, Sir Melville: Macnaughten Memorandum - by Fiver 1 hour ago.
Elizabeth Stride: The Schwartz/BS Man situation - My opinion only - by NotBlamedForNothing 1 hour ago.
Macnaghten, Sir Melville: Macnaughten Memorandum - by Wickerman 1 hour ago.
Motive, Method and Madness: 39 wounds - by The Rookie Detective 1 hour ago.
Macnaghten, Sir Melville: Macnaughten Memorandum - by Simon Wood 1 hour ago.

Most Popular Threads:
Elizabeth Stride: The Schwartz/BS Man situation - My opinion only - (29 posts)
Macnaghten, Sir Melville: Macnaughten Memorandum - (14 posts)
Abberline, Inspector Frederick: The Investigator's Suspects - (8 posts)
Motive, Method and Madness: 39 wounds - (7 posts)
Pub Talk: Poe was a time traveler… according to this article. - (4 posts)
Ripper Discussions: Motive, Method and Madness - (2 posts)


The Kelly Crime Scene Photographs
Stewart P. Evans

Regarding the provenance of the original prints of the famous photographs of the murder scene at 13 Miller's Court, 26 Dorset Street, Spitalfields, two relevant references have been written. They are as follows --

From The Complete Jack the Ripper, Donald Rumbelow, 1975, pp. 146-147:--

Several years ago, through the permission of the Commissioner of the City Police, I was able to place in the Eddowes and Kelly file [at New Scotland Yard] copies of the original photographs which were in their possession and to deposit similar sets with the Black Museum and Bow Street Historical Museum. One can only assume that the Kelly photograph was removed from the file at a much earlier date, since Sir Melville Macnaghten refers to it in his notes. Stranger still was the fact that the photograph was the work of the City Police, in spite of the dressing down they had received from Sir Charles Warren for being in Whitechapel. A story which explains this, although it is at variance with the newspaper accounts, is that although the Metropolitan Police didn't dare to disobey Warren's order and break down Kelly's doorway before the bloodhounds arrived, the City Police did so as they ran no such risks. Apparently as the morning dragged on, and nothing happened in Miller's Court, somebody quietly asked the City Police for their help which they gave by breaking into Kelly's room and taking the photograph of her body as their only justification for doing so. Certainly all the surviving photographs of Ripper victims were taken by the City of London Police. Curiously enough, they may have taken others. The photograph of Miller's Court is now a well-known one, but it was only by chance that I found it and published it in Police Journal in 1969. In 1967 the City Police photographic department were clearing out a lot of old negatives, including some glass ones, and by chance I happened to spot them. Two were of immediate interest. One was of some Metropolitan policemen, taken about 1870, and the other - which I instantly recognized - was of Miller's Court, of which no photograph was known to exist. When I tried to trace their source, I was told that they had come from a large album of photographs which disappeared when the force museum was broken up in 1959 and lost at the same time as the 'From Hell' letter, which vanished with it. I don't believe that they have been lost forever. But their present whereabouts is still a mystery.

Bill Waddell, The Black Museum, 1993:-

In 1988, on the centenary of the Ripper murders, I received an envelope which contained papers from the Ripper files that had not been seen for many years, including the original 'Dear Boss' letter. They were sent from Croyden, and the envelope was tested for fingerprints. After eliminating the prints of those who had handled it, one set was found of which there was no trace. Who sent them has never been discovered. I also found other interesting material relating to the Ripper. While going through some old photograph albums that had been used for CID training, I found pictures of the five victims. The scramble to release them to the press was one of the most remarkable experiences of my forty years with the Metropolitan Police.

Extract from the Daily Telegraph, August 19, 1988:-

Jack the Ripper letter and pictures returned to Yard 100 years after Killing.
By Neil Darbyshire
Crime Correspondent

... Also shown publicly for the first time yesterday were original post mortem photographs of three of the Ripper's victims which had been presumed lost. They were returned to Scotland Yard separately [from the 'Dear Boss' letter, Bond report, Crippen items etc.] by the family of a senior police officer who died recently.

   It is not known how the photographs came into his possession but he is believed to have used them to illustrate criminology lectures.

Extract from The Independent, Friday 19 August 1988:-

Faces fail to solve Ripper puzzle.
By Terry Kirby
Crime Correspondent

IF NOTHING else, at least one more piece has been added to the jigsaw. John Dellow, deputy commissioner of the Metropolitan Police, said yesterday at the unveiling of the previously lost papers and photographs from the Jack the Ripper murders.

  Of all unsolved murders, it is the file that remains open. The interest it attracts is shown by the American tourists, mainly women, who take "Tragical History Tours" around Whitechapel, and the attendance at yesterday's press conference.

  The fact that the material has turned up in the centenary year and that some of it is of mysterious origin is yet another puzzle for the Ripperologists...

  But Scotland Yard was presenting an interesting historical artefact, rather than a belated operational development.

  Mr. Dellow, chairman of the Force Historical Society, said: "I don't think it brings us any closer to solving the mystery. The new mystery for us is where the documents came from - an dwe are no nearer solving that."

  The photographs are from the collection of a recently deceased former police officer and they were handed to Scotland Yard by his family. His name is not being disclosed.

  Bill Waddell, curator of the Black Museum at Scotland Yard, said five were new to contemporary criminologists. "It is the first time we have seen these three faces," he said. they show Mary Ann Nicholls [sic], the first victim on August 31, 1888, with her throat slashed; Elizabeth Stride, on a mortuary slab; and Annie Chapman in her coffin.

  Mary Jeanette Kelly, the last victim, in November 1888, is pictured twice on the bed where she was mutilated and disembowelled.

  Similar pictures are in the Black Museum, but taken from a different angle. The sixth, already known to criminologists, shows Catherine Eddowes, slashed and disembowelled...

  Anyone considering further research with the new material will have to wait until it reaches the records office. The photographs will go to the Black Museum.

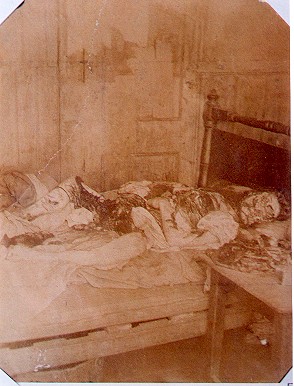
The famous photograph of the body of Mary Kelly, full length, lying on the bed is thus known to exist in the form of two separate original prints, as described above. They are easily identifiable from each other and may be described as follows:-

These two photographs, copies of both of which have appeared in many books on 'Jack the Ripper,' are identified as follows:-

Photograph No. 1 - CLP/MJK 1 - [Located in the City of London Police photographic department in 1967 by Donald Rumbelow]  Has a tear at the bottom centre and a 'light spot' just to the left of the apparent letter 'M' above the body. There are also two pin-holes at the top centre. It is understood that Don Rumbelow passed this original to the Black Museum and that it is still there.

Photograph No. 2 - NSY/MJK2 - [Found in the album returned to New Scotland Yard in 1988]  Lacks the aforementioned blemishes to CLP/MJK1, and has a pin at top left corner, and corner fixing marks at both right corners. It also appears to be a paler sepia colour. Around 1993 it sustained a crack which runs across the top left of the photograph, just missing Kelly's foot. This original print is now held at the Public Record Office, Kew, Reference MEPO 3/3155. The crack damage was sustained before the page was microfilmed. [NB the same file page contains the photographs of Nichols, Chapman, Eddowes standing against the wall, and the second Kelly photograph taken from the opposite side of the bed - ref. NSY/MJK3]. This photograph usually appears paler and less 'contrasty' than Photograph No. 1.

Having recorded the provenance and description of the Kelly photographs it is interesting to note their use in Ripper related books:-

  1. Vacher l'Eventreur et les Crimes Sadiques, Lacassagne, Lyons/Paris 1899, presumably an original print additional to the above, current location not known.
  2. Police Journal, 1969 - CLP/MJK1.
  3. Jack the Ripper, Farson, 1972 - CLP/MJK1.
  4. The Complete Jack the Ripper, Rumbelow, 1975 - CLP/MJK1.
  5. Jack the Ripper, The Final Solution, Knight, 1976 [close-up] - CLP/MJK1.
  6. The Complete Jack the Ripper, Rumbelow, 1987 - CLP/MJK1.
  7. Jack the Ripper: 100 Years of Mystery, Underwood, 1987 [close-up] - CLP/MJK1.
  8. Jack the Ripper the Uncensored Facts, Begg, 1988 [close-up] - CLP/MJK1.
  9. New Murderers' Who's Who, Gaute/Odell, 1989 [close-up] - CLP/MJK1.
  10. Jack the Ripper the Mystery Solved, Harrison, 1991 [close-up] - CLP/MJK1.
  11. The Ripper and the Royals, Fairclough, 1991 - CLP/MJK1.
  12. The Jack the Ripper A - Z, Begg/Fido/Skinner, 1991 [close-up] - CLP/MJK1.
  13. Diary of Jack the Ripper, Harrison, 1993 [in album with crack] - NSY/MJK2.
  14. The Black Museum, Waddell, Waddell, 1993 [reversed!] - NSY/MJK2.
  15. The Complete History of Jack the Ripper, Sugden, 1994 [close-up] - CLP/MJK1.
  16. The Lodger, Evans/Gainey, 1995 [no damage] - NSY/MJK2.
  17. Jack the Ripper the Simple Truth, Paley, 1995 [with crack] - NSY/MJK2.
  18. Jack the Ripper A - Z, Begg/Fido/Skinner, 1996 p/b [close-up with crack] - NSY/MJK2.
  19. The Secret of Prisoner 1167, Tully, 1997 [close-up] - CLP/MJK1.
  20. Jack the Ripper Whitechapel Murders, O'Donnell, 1997 [close-up] - CLP/MJK1.
  21. Le Livre Rouge de Jack l'Eventreur, Bourgoin, 1998 - CLP/MJK1.

As may be seen, the majority of the books use the photograph located by Don Rumbelow, in many cases poor copies of it, usually as close-ups. However, the New Scotland Yard copy of the photograph, located in 1988, has gradually come into circulation.

On May 29, 1998 I questioned Don regarding the photograph. He stated that no negative was found, only the photograph. This, he said, he had copied and then placed the original with the Black Museum. Don has a first generation copy from this negative, and passed one to Professor Francis Camps at the London Hospital also. He has no spare copies of the Police Journal in which, in 1969, he first published the photograph. The importance of Don's actions, and his foresight in preserving these items back in the 1960's cannot be overemphasized.

Other Copies

The copy used by Lacassagne, not known if still in existence, has already been mentioned. Another copy was in the possession of Dr. Percy J. Clark, Dr. Bagster Phillips' assistant, in 1910. A fifth copy was amongst the documents, including the Littlechild letter, purchased by antiquarian dealer Eric Barton from Sotheby's in the early 1960's. These documents were the remains of the criminological collection of George R. Sims, and it was presumably given to Sims, with other Miller's Court photographs, by Sir Melville Macnaghten, his close friend. In his 1907 article in Lloyd's Weekly News Sims refers to these photographs being in his collection. Eric told me, 1993, that he had never sold the photographs and that to the best of his knowledge they were still somewhere amongst his collection at Sheen Road, Richmond. They were never located before Eric died.

Stewart P. Evans, copyright, 1998.


Related pages:
  Mary Jane Kelly
       Home: Timeline - Mary Jane Kelly 
       Dissertations: Did Kelly Have a Heart? 
       Dissertations: Did Mary Kelly Survive? 
       Dissertations: Estimating Mary Kellys Time of Death 
       Dissertations: Is Truth Stranger Than Fiction? A Response to Des McKenna 
       Dissertations: Kit, Kitty, Kitten: The Story of Kitty Ronan 
       Dissertations: Mary Kelly 
       Dissertations: Mary Kelly is Dead 
       Dissertations: McCarthy, Kelly and Breezer's Hill 
       Dissertations: Providence Row Night Refuge 
       Dissertations: Reinvestigating Murder: The Kelly Enigma 
       Dissertations: Room 13 Millers Court 
       Dissertations: The Enigmas of Millers Court 
       Dissertations: The Enigmas of Millers Court 
       Dissertations: The Funeral of Mary Jane Kelly 
       Dissertations: The Mystery of Mary Jane Kelly 
       Dissertations: The Origins of Mary Kelly 
       Dissertations: The Whitechapel Dossier: Dorset Street and Miller’s... 
       Dissertations: Time is on My Side 
       Dissertations: What Happened at Miller's Court? 
       Message Boards: Mary Jane Kelly 
       Official Documents: Dr. Bond's Post Mortem on Mary Kelly 
       Official Documents: Mary Jane Kelly's Inquest 
       Press Reports: Atlanta Constitution - 12 November 1888 
       Press Reports: Barking and East Ham Advertiser - 24 November 1888 
       Press Reports: Bismarck Daily Tribune - 10 November 1888 
       Press Reports: Boston Daily Globe - 10 November 1888 
       Press Reports: Boston Daily Globe - 9 November 1888 
       Press Reports: Bournemouth Visitors Directory - 14 November 1888 
       Press Reports: Croydon Advertiser - 10 November 1888 
       Press Reports: Croydon Advertiser - 17 November 1888 
       Press Reports: Croydon Times - 14 November 1888 
       Press Reports: Daily News - 10 November 1888 
       Press Reports: Daily News - 12 November 1888 
       Press Reports: Daily News - 13 November 1888 
       Press Reports: Daily News - 14 November 1888 
       Press Reports: Daily News - 15 November 1888 
       Press Reports: Daily News - 16 November 1888 
       Press Reports: Daily News - 19 November 1888 
       Press Reports: Daily News - 20 November 1888 
       Press Reports: Daily Telegraph - 10 November 1888 
       Press Reports: Daily Telegraph - 12 November 1888 
       Press Reports: Daily Telegraph - 13 November 1888 
       Press Reports: Daily Telegraph - 16 November 1888 
       Press Reports: East and West Ham Gazette - 10 November 1888 
       Press Reports: East London Advertiser - 17 November 1888 
       Press Reports: East London Advertiser - 24 November 1888 
       Press Reports: East London Observer - 10 November 1888 
       Press Reports: East London Observer - 17 November 1888 
       Press Reports: Eastern Post - 10 November 1888 
       Press Reports: Eastern Post - 17 November 1888 
       Press Reports: Echo - 10 November 1888 
       Press Reports: Echo - 12 November 1888 
       Press Reports: Echo - 13 November 1888 
       Press Reports: Echo - 9 November 1888 
       Press Reports: Edwardsville Intelligencer - 14 November 1888 
       Press Reports: Evening News - 10 November 1888 
       Press Reports: Evening News - 12 November 1888 
       Press Reports: Evening News - 13 November 1888 
       Press Reports: Evening News - 14 November 1888 
       Press Reports: Evening News - 19 November 1888 
       Press Reports: Evening News - 9 November 1888 
       Press Reports: Evening Star - 10 November 1888 
       Press Reports: Evening Star - 9 November 1888 
       Press Reports: Florida Times - 10 November 1888 
       Press Reports: Frederick News - 10 November 1888 
       Press Reports: Galveston Daily News - 11 November 1888 
       Press Reports: Globe [Canada] - 12 November 1888 
       Press Reports: Globe [Canada] - 13 November 1888 
       Press Reports: Graphic - 17 November 1888 
       Press Reports: Illustrated Police News - 17 November 1888 
       Press Reports: Irish Times - 10 November 1888 
       Press Reports: Irish Times - 12 November 1888 
       Press Reports: Irish Times - 13 November 1888 
       Press Reports: Kellogg Enterprise - 16 November 1888 
       Press Reports: Macclesfield Courier and Herald - 17 November 1888 
       Press Reports: Macleod Gazette - 11 November 1888 
       Press Reports: Manchester Guardian - 10 November 1888 
       Press Reports: Manchester Guardian - 14 November 1888 
       Press Reports: Manitoba Daily Free Press - 10 November 1888 
       Press Reports: Marion Daily Star - 10 November 1888 
       Press Reports: Marion Daily Star - 12 November 1888 
       Press Reports: Montreal Daily Star - 14 November 1888 
       Press Reports: Montreal Gazette - 12 November 1888 
       Press Reports: Morning Advertiser - 10 November 1888 
       Press Reports: Morning Advertiser - 12 November 1888 
       Press Reports: Morning Advertiser - 13 November 1888 
       Press Reports: Morning Advertiser - 15 November 1888 
       Press Reports: Morning Advertiser - 16 November 1888 
       Press Reports: Morning Advertiser - 20 November 1888 
       Press Reports: Munster News - 10 November 1888 
       Press Reports: Munster News - 14 November 1888 
       Press Reports: New York Herald - 10 November 1888 
       Press Reports: New York Herald - 11 November 1888 
       Press Reports: New York Times - 10 November 1888 
       Press Reports: New York Tribune - 10 November 1888 
       Press Reports: New York World - 10 November 1888 
       Press Reports: New York World - 11 November 1888 
       Press Reports: Ottawa Citizen - 10 November 1888 
       Press Reports: Ottawa Free Press - 9 November 1888 
       Press Reports: Pall Mall Gazette - 10 November 1888 
       Press Reports: Pall Mall Gazette - 12 November 1888 
       Press Reports: Pall Mall Gazette - 13 November 1888 
       Press Reports: Pall Mall Gazette - 14 November 1888 
       Press Reports: Pall Mall Gazette - 19 November 1888 
       Press Reports: Penny Illustrated Paper - 17 November 1888 
       Press Reports: Penny Illustrated Paper - 24 November 1888 
       Press Reports: Port Philip Herald - 10 November 1888 
       Press Reports: St. James Gazette - 10 November 1888 
       Press Reports: St. James Gazette - 13 November 1888 
       Press Reports: St. James Gazette - 14 November 1888 
       Press Reports: Star - 10 November 1888 
       Press Reports: Star - 12 November 1888 
       Press Reports: Star - 13 November 1888 
       Press Reports: Star - 14 November 1888 
       Press Reports: Star - 19 November 1888 
       Press Reports: Star - 9 November 1888 
       Press Reports: Syracuse Herald - 11 November 1888 
       Press Reports: Thanet Advertiser - 17 November 1888 
       Press Reports: Times [London] - 10 November 1888 
       Press Reports: Times [London] - 12 November 1888 
       Press Reports: Times [London] - 13 November 1888 
       Press Reports: Times [London] - 14 November 1888 
       Press Reports: Times [London] - 19 November 1888 
       Press Reports: Times [London] - 20 November 1888 
       Press Reports: Trenton Times - 10 November 1888 
       Press Reports: Trenton Times - 12 November 1888 
       Press Reports: Trenton Times - 9 November 1888 
       Press Reports: Walthamstow and Leyton Guardian - 24 November 1888 
       Press Reports: Weekly Herald - 16 November 1888 
       Ripper Media: Jack l’Eventreur: Le Secret de Mary Jane K. 
       Ripper Media: Mary Jane Kelly: La derniere victime 
       Ripper Media: The Inquest of the Final Victim of Jack the Ripper, Mary ... 
       Ripper Media: Will the Real Mary Kelly? 
       Victims: A Violet From Mother's Grave 
       Victims: Mary Jane Kelly 
       Victims: Testimonies of George Hutchinson and Sara Lewis 
       Victorian London: Dorset Street 
       Victorian London: Overcrowding in a School Room 
       Witnesses: Elizabeth Phoenix 
       Witnesses: Lizzie Albrook 
       Witnesses: Thomas Bowyer 
       Witnesses: Walter Beck 
  Stewart Evans
       Authors: A Talk With Stewart Evans, Parts I & II 
       Authors: An Interview with Stewart Evans 
       Authors: An Interview with Stewart Evans 
       Authors: Melvin Harris (1930-2004) 
       Dissertations: A Reply to Kosminski and the Seaside Home 
       Dissertations: A Slouch Hatted Yank: A Few Thoughts on the Newly Found I... 
       Dissertations: Arthur Griffiths, Robert Anderson, & Jack the Ripper 
       Dissertations: Ex-Detective Inspector Edmund Reid And Jack the Ripper 
       Dissertations: Kosminski and the Seaside Home 
       Dissertations: On the Origins of the Royal Conspiracy Theory 
       Dissertations: Reader Reactions 
       Dissertations: Suspect and Witness - The Police Viewpoint 
       Dissertations: The Identification of Liz Stride 
       Dissertations: Walking the Beat 
       Official Documents: The Littlechild Letter 
       Ripper Media: Jack the Ripper and the Whitechapel Murders 
       Ripper Media: Jack the Ripper: First American Serial Killer 
       Ripper Media: Jack the Ripper: Letters From Hell 
       Ripper Media: Jack the Ripper: Scotland Yard Investigates 
       Ripper Media: The Man Who Hunted Jack the Ripper 
       Ripper Media: The Ultimate Jack the Ripper Sourcebook 
       Victorian London: A Visit to Whitechapel